


Damage limitation for when you f*ck up
What to do in a posting emergency to rectify the situation smoothly.


We all make mistakes
If you’re anything like me, you will at some point in your Substack journey post something that you later decide was not a good idea!
Most of the time a simple unpublish (if it’s a Post) or delete (if it’s a Note) will suffice.
However, in the event of you needing to not only get rid of the offending article, but also to issue a correction to the readers who received it, here’s my step by step guide.
1. Unpublish the post
You will know when this action is appropriate, as you will have a growing sense of dread and feel the need to knee-jerk your way out of trouble!
Luckily you can simply select ‘Unpublish’ from the Post’s drop down menu in the dashboard, while you decide what other actions you might want to take.
Panic not, this does not delete the post for all eternity, it simply moves it to the ‘Drafts’ section with a very obvious ‘[UNPUBLISHED]’ at the start of the title.
2. Only minor edits required?
You can take a breath at this point, the post is longer showing on Substack and any link going to it, will result in a dead end, so at least it can’t cause more offence and deepen the hole that you’re currently in.
Obviously the emails were sent out, and there’s nothing you can do to change them, so let’s focus on the Substack version for now, and circle back around to those later.
A lot of people (myself included) only view your posts in the Substack app, as they’ve changed their Notifications Settings to ‘Smart notifications’, so if you’ve realised your error quickly a lot of your readers will be blissfully unaware of your cock-up yet and so there is time to edit, save and republish before they even know what’s going on.
3. Major edits required?
If you need to rewrite a section of it, or rethink it entirely, then before you start editing make a copy, by selecting ‘Duplicate to drafts’ from the unpublished post’s menu, this one will be entitled [UNPUBLISHED COPY] to you can tell them apart.
Here’s the clever bit…
You might naturally think that the next step would be to start editing the new, shiny copy, but I think it’s better to leave that one as a record of what was emailed out, in case those readers kick-off at a later date and you want proof of what you actually wrote, and use the original unpublished post as the basis for the rewrite or apology, whatever you think is the appropriate response.
The reason for this is to preserve the url link and social proof (Likes & Comments) from the original, so any Restacks or Notes that it may have featured in will all point to the edited version (of the original) not just result in a dead end if anyone clicks through.
Here’s a snapshot from my own edited post, showing it still has the original Post URL (at the bottom), so when re-published it will have the same digital address.
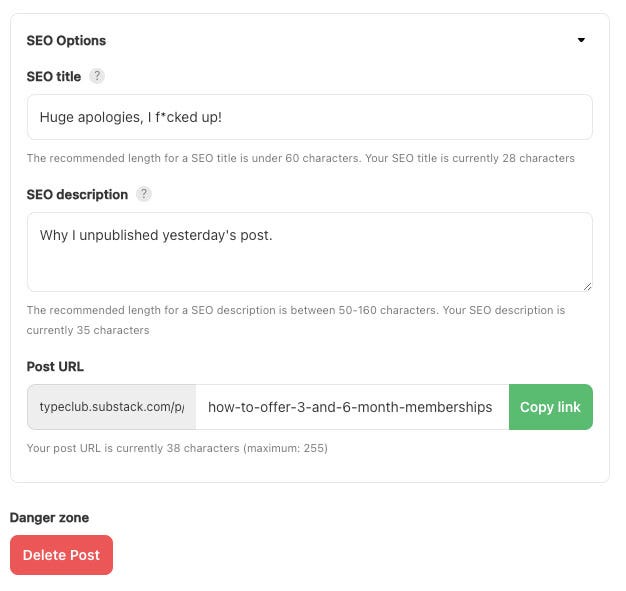
You can find this info in the Post Settings, right down the bottom, just above the danger zone (as above).
Once you are happy with the new version of the post, then ‘Publish now’, and it will appear on your Substack, but it won’t give you an opportunity to email it out again, as it knows you have already emailed this one out previously.
As if by magic, all the Likes and Comments that the original post acquired before you unpublished it, will come back too. Delete as appropriate or just leave them in.
4. What about those email readers?
If you also feel the need to issue an apology to everyone who you emailed it to, or perhaps just need to make a fact correction or two, you can do this by creating a separate email, and sending it out via the Subscribers menu, without it being posted to your home page.
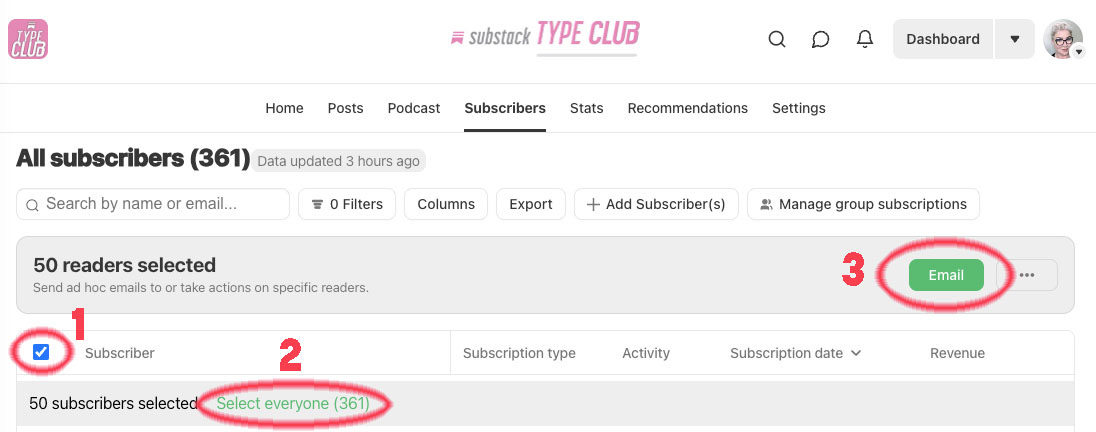
Here’s how… go to your Dashboard => Subscribers:
Click on the checkbox next to ‘Subscriber’, this will select the first 50 subs.
Click on ‘Select everyone’ to send to the entire list.
Click on ‘Email’, which will bring up an empty email, the likes of which you haven’t seen since you started your Substack… as surely these days you start each email with a duplicate of a previous one to preserve the header, footer and tags in Settings. No? You might want to start doing that to save a few keystrokes. 😉
Once you’re happy with the content, click on ‘Send email’ top right, and off it goes!
This method will also explain why you sometimes get actual emails from Substacks that you’re subscribed to, despite the fact that you thought you only receive them in the App, as this overrides that and delivers them to the email inboxes.
The email will show up differently to the post in your dashboard, so you can easily tell them apart, and you can still enjoy viewing the stats.
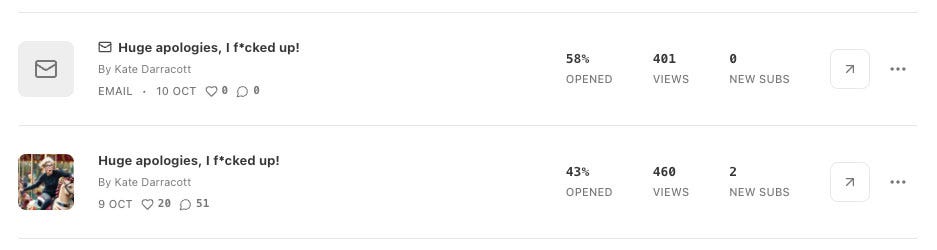
Fun fact: ‘Huge apologies, I f*cked up!’ is a winning headline, a whopping 58% opened it, versus the 43% who opened the original! 😂
5. Put the kettle on, crisis averted.
Feel your heart rate go back down to normal, and congratulate yourself on handling what could have been a sticky situation rather well.
Everyone makes mistakes, if we didn’t, we wouldn’t be moving forward and trying new things, so just own it when it’s your turn, and try and limit the damage.
Fun fact: I even acquired 2 new subscribers from the apology (see above)! 😃

Restack giveaway!
Another chance to win a 3 Month Membership for a random Restacker!
Simply Restack this post before Tuesday 29 October at 3pm (BST London), when one of you will be selected at random to receive the three month upgrade to Paid.
If you are already a Paid member and win, I will extend your membership by three months for free. 🎉
Last week’s winner…
Congratulations to
who won last week’s giveaway! 👏I will be comping you up to a full membership for the next 3 months, and hopefully meeting you in person at one of the Geek Outs! 😃
That’s all for this week, see you in the Comments below! 😘
K8x
PS: Please ‘❤️’ below and Restack to WIN a 3 Month Membership to Type Club.


oh wheeeee! thank you thank you!
Muchisimas gracias, Kindly Kate!